
How To Assess Movement Quality At Home
- Tony Palladino

- Mar 28
- 10 min read
Updated: Apr 7
You Don’t Need a Gym to Check How Your Body Moves: A Guide to At-Home Movement Assessments
You don’t need a gym to check how your body moves. Simple at-home assessments can identify muscle imbalances, tightness, or weaknesses that may lead to injuries. By spotting these issues early, you can create tailored fitness and nutrition plans to improve strength, flexibility, and coordination.
Here’s how to get started:
Use basic tools like a mirror, smartphone, and a chair for quick tests.
Perform simple movements like squats, posture checks, and balance exercises to evaluate your form.
Take notes on any discomfort, instability, or alignment issues.
Key Movement Tests
Standing Posture Check: Look for misalignments in your feet, knees, hips, shoulders, and head.
Overhead Squat Test: Assess mobility and stability by observing how your body moves during squats.
Single-Leg Balance and Squat Test: Identify differences in strength and stability between your left and right sides.
Track your progress with a scoring system (1–10) based on ease and quality. Use results to target problem areas with foam rolling, stretching, and strengthening exercises. If needed, consult a coach for expert guidance.
Takeaway: These simple tests help you move better, reduce injury risk, and build a fitness routine that works for your body.
Getting Ready for Your Assessment
Getting ready for a movement quality assessment is all about preparation. A little effort beforehand ensures the results are accurate and useful for creating a workout plan that fits your needs.
What You'll Need
You don't need much—just a few basic items to make the process smooth. First, grab a smartphone or camera to record your movements. This helps you review your form later and spot any compensations you might miss in the moment. If you don’t have a tripod, no problem! A stack of books works just as well to keep your camera steady.
A mirror is another handy tool for instant feedback. Set up your camera so it captures your entire body, head to toe, and aim for a plain wall as your backdrop. Keep a standard chair nearby for modified squat tests, and have a sturdy book or small board ready to elevate your heels for ankle mobility checks. Wear comfortable, non-restrictive clothing and go barefoot—this allows for a clear view of your joints and feet.
Once you’ve got everything set up, take a moment to assess your body’s current condition before diving into the tests.
Note Any Pain or Restrictions
Pay attention to any discomfort or limitations before starting. Ask yourself: "Am I feeling any pain? Do I notice stiffness or tightness anywhere?" If needed, rate the discomfort on a scale of 1 to 10 while performing simple movements. This step can help you identify areas of tightness or weakness, especially around your hips and knees.
"This screen is used as a guide, not as a diagnosis or replacement for medical care." - Heather Casey, CSCS
If something feels off or causes sharp pain, don’t push through it. Trust your instincts and stop immediately. Once you’ve identified any restrictions, you’re ready to set up a space where you can focus fully on your assessment.
Prepare Your Space
Find a flat, well-lit area with plenty of room to move around. Position your camera to capture your entire body clearly. If you have a mirror, use it for real-time feedback. Alternatively, ask a friend or family member to watch and provide observations. The key is to create a quiet, distraction-free space where you can concentrate on how your body moves.
How to Perform Each Movement Test
Now that your space is ready, it’s time to dive into the tests. These assessments move from static positions to dynamic movements, giving you a clearer picture of how your body functions. Each step builds on your baseline posture, helping to pinpoint areas where stability or coordination might need work. Take your time with each test to ensure you capture accurate results.
Standing Posture Check
Start by standing naturally in front of a mirror with your feet shoulder-width apart and pointing straight ahead. This is your baseline—a quick look at how your body aligns when you’re not actively adjusting your posture.
"The Static Postural Assessment is a snapshot of posture without movement." – Kyle Stull, NASM Master Instructor [3]
Check five key areas from the ground up:
Feet and ankles: Are your arches collapsed, or do your feet turn outward?
Knees: Do they align over your second and third toes, or do they cave inward or bow outward?
Hips and pelvis: Is your weight more on one side, or does your pelvis tilt forward or backward?
Shoulders: Are they rounded or uneven?
Head and neck: Is your head in a neutral position, or does it jut forward?
Now, turn to the side and repeat the check. Ideally, your ear should line up with your shoulder and hip. Any major deviations from this alignment could point to muscles that are tight or weak. Once you’ve assessed your static posture, it’s time to see how it holds up during movement with the Overhead Squat Test.
Overhead Squat Test
This test evaluates how well your body manages movement. Stand with your feet shoulder-width apart and extend both arms overhead, keeping your elbows straight. Slowly squat down in a controlled motion, then return to standing. Perform 5–10 repetitions, focusing on your form throughout.
"The OHSA is our first real look at movement. It shows how well the client can control their movement, their average range of motion, stability, and coordination." – Kyle Stull, NASM Master Instructor [3]
Pay attention to the same alignment points from the Standing Posture Check. Look for signs like feet flattening, knees caving inward or bowing outward, your torso leaning forward, or your arms dropping forward. These can indicate limited mobility or stability.
If your heels lift or you lean forward excessively, try repeating the test with your heels elevated on a small book. If this improves your form, restricted ankle mobility might be the culprit. Similarly, if placing your hands on your hips instead of reaching overhead helps, it could point to tightness in your lats.
Single-Leg Balance and Squat Test
This test is all about identifying differences in stability and strength between your left and right sides. Begin by standing with your feet hip-width apart and your hands on your hips. Lift one leg off the ground, then perform a squat on your standing leg to a depth that feels comfortable. Return to the starting position and repeat five times on each leg.
While performing the test, watch for three key issues:
Does your knee collapse inward toward your midline?
Does your hip hike up or drop down on one side?
Does your torso rotate during the movement?
These compensations could signal muscle imbalances or areas of tightness. If you struggle with balance, modify the test by performing a split squat, letting your non-working leg lightly touch the ground. This adjustment still helps you spot knee and pelvic tracking issues while reducing the challenge of single-leg stability.
Understanding Your Results
Grasping your movement test results is crucial for building a home fitness routine that strengthens your body, prevents injuries, and fits into your lifestyle. Start by reviewing your test outcomes for patterns of compensation—these could be signs of tightness, weakness, or limited mobility.
How to Score Your Performance
Tracking your progress is easier with a simple scoring system. Rate each movement on a scale of 1 to 10 based on two factors: Ease and Quality. For Ease, a score of 1–2 means the movement required maximum effort, while 8–10 reflects relaxed execution. For Quality, 1–2 indicates shaky form, and 8–10 shows smooth, controlled motion [2].
"Instead of equating high effort with what you want in a workout, go for improving the ease and quality of how you move." – GMB Fitness [2]
Don't expect perfect scores right away. For instance, if your first overhead squat scores a 4 or 5, treat it as valuable feedback rather than a sign of failure. Performance can fluctuate daily, so focus on long-term trends over several weeks.
Finding Your Weak Points
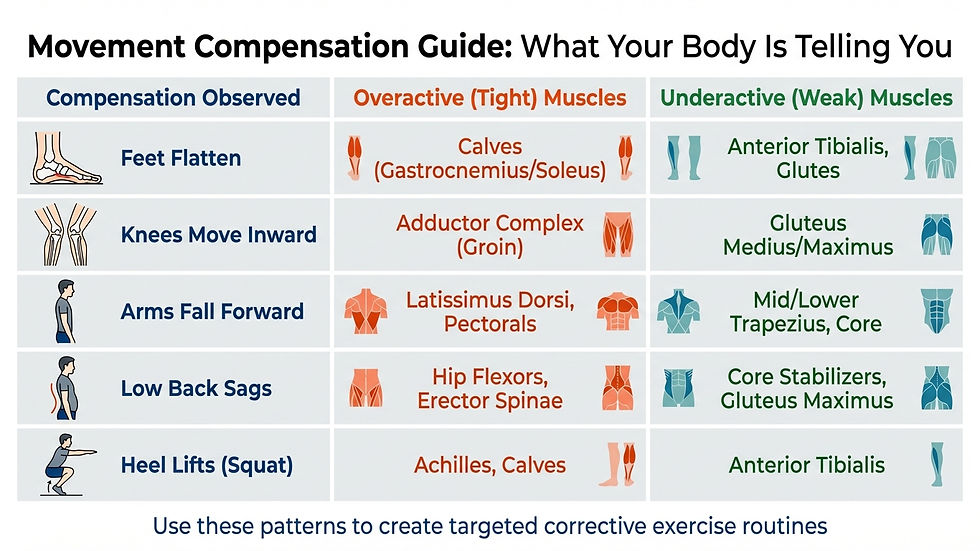
Movement compensations often highlight imbalances between overactive (tight) muscles and underactive (weak) ones that disrupt proper alignment [1]. Identifying these imbalances allows you to target specific areas with corrective exercises.
For example:
Knee caving inward may point to tight adductors and weak glutes.
Feet flattening or turning outward could suggest tight calves opposing weak anterior tibialis and glutes [1][3].
Arms falling forward during an overhead squat might indicate tight latissimus dorsi and pectorals, with a need to strengthen the mid and lower trapezius [1].
Use the modifications you tested earlier to pinpoint the root causes. For instance, if elevating your heels or placing your hands on your hips improves your alignment, you might have limited ankle dorsiflexion or tight lats [3]. Understanding these specifics helps you focus your efforts where they’re needed most.
Compensation Observed | Likely Overactive (Tight) Muscles | Likely Underactive (Weak) Muscles |
Feet Flatten | Calves (Gastrocnemius/Soleus) | Anterior Tibialis, Glutes |
Knees Move Inward | Adductor Complex (Groin) | Gluteus Medius/Maximus |
Arms Fall Forward | Latissimus Dorsi, Pectorals | Mid/Lower Trapezius, Core |
Low Back Sags | Hip Flexors, Erector Spinae | Core Stabilizers, Gluteus Maximus |
Heel Lifts (Squat) | Achilles, Calves | Anterior Tibialis |
Pay close attention to asymmetries between your left and right sides. If one leg felt significantly weaker or less stable during a single-leg squat, prioritize that side for corrective work [1][4]. Side-to-side imbalances often predict injury risk more effectively than general tightness or weakness. Use these observations to guide your corrective exercises and gradually enhance the quality of your movements.
How to Improve Your Movement Quality
Once you've pinpointed areas that need improvement, it's time to tackle those weaknesses with foam rolling, focused stretching, and activation exercises.
Add Corrective Exercises
Start by foam rolling tight spots like your inner thighs, hip flexors, lats, and pectorals for 30–60 seconds each. Follow this with mobility drills such as wall slides and kneeling hip flexor stretches, holding each stretch for 30–60 seconds and repeating twice.
Next, strengthen weaker muscles with exercises like mini-band lateral walks (2 sets of 15–20 steps), forearm planks with knee taps (2 sets of 10–12 reps), or banded distraction stretches to improve ankle mobility. Aim to perform these routines 2–3 times a week. To boost coordination and flexibility further, try incorporating full-body movements like bear crawls or inchworms into your routine.
As you work on these corrections, it’s important to check in regularly to see how your movement quality is progressing.
Track Your Progress
After adding corrective exercises to your routine, tracking your development is essential. Reassess your movements periodically using the same methods and scoring system you used initially. Keep a record of both Ease and Quality scores for each movement to measure progress. Be sure to note any compensations, like knee valgus or feet flattening, that may still occur. Improvement often happens gradually, so focus on long-term trends rather than expecting immediate results. If you’re testing both sides of your body, monitoring the gap between your stronger and weaker side can reveal how well symmetry is improving.
Consider Working with a Coach
If you’re not seeing the results you want on your own, working with a coach can provide the personalized strategies you need to refine your movement patterns. While self-assessments are a great starting point, translating those findings into an effective program can be tricky. A skilled coach can pinpoint the root causes of your limitations and create a plan tailored specifically to your needs.
Professional coaching is especially helpful if you’re dealing with persistent pain, noticeable imbalances, or slow progress. A coach can build on your home assessment results, addressing lingering issues and fine-tuning your approach. For example, Toned By Tony’s Fit & Functional program offers a blend of functional strength training and personalized coaching. Designed for busy women, this program includes custom workout plans, weekly check-ins, and access to a supportive community, all with a focus on creating sustainable fitness habits.
Another key benefit of working with a coach is their ability to spot compensations you might overlook. Whether it’s limited ankle mobility, tight hips, or another issue in your kinetic chain, they can identify the problem and adjust your program to address it effectively.
Conclusion
Evaluating your movement quality at home gives you the tools to make smarter training decisions. These simple, step-by-step tests help you create a workout plan that fits your specific needs. Instead of guessing, you can zero in on whether to prioritize strength, flexibility, or coordination—helping to lower injury risks and improve how you move every day.
Progress takes time, so aim for steady improvement rather than instant results. Stick with the same rating scale each time you reassess, and focus on overall trends rather than letting one off-day discourage you. Even small wins, like smoother movement or less effort, show that your hard work is making a difference.
Home assessments can reveal a lot, but they might miss subtle issues or compensations. If you're unsure how to use your results to adjust your training, a professional can help identify the root causes of your challenges and design a plan tailored to your needs.
These assessments don’t just inform your corrective exercises; they also shine a light on when expert help is necessary. For example, research on female collegiate athletes found that those with movement screen scores below 14 had nearly four times the risk of lower-extremity injuries [5]. This underscores how professional input can play a key role in addressing movement problems and reducing injury risks.
If you’re ready to take your movement quality to the next level, personalized coaching might be the answer. Programs like Toned By Tony's Fit & Functional program offer tailored workout plans, weekly check-ins, and expert guidance. Designed for busy women, this program helps you build strength, mobility, and confidence—all while avoiding burnout. Plus, you'll join a community focused on sustainable habits that make lasting improvements to your movement and overall fitness.
FAQs
How often should I redo these movement tests?
Repeating movement assessments regularly is a great way to track your progress and spot any new limitations. Many people find it helpful to reassess every 4 to 6 weeks, or whenever they notice changes in their movement or mobility. This approach allows you to monitor improvements and fine-tune your routine to get the best results.
What should I do if a test causes pain?
If you feel pain during a movement test, stop right away to prevent worsening the situation. Pain can be a sign that the movement isn't safe or that there may be an underlying problem requiring attention. Reach out to a healthcare professional or a qualified trainer to figure out the cause before attempting the test again or moving on to other exercises. Staying cautious helps protect you from injuries and supports better progress over time.
How do I turn my scores into a simple workout plan?
To build a workout plan based on your movement assessment scores, focus on tackling the specific areas of imbalance or weakness highlighted during the assessment. Include exercises tailored to these needs—like mobility drills to address tightness or strength exercises to target weaker muscles. Start with foundational movements and gradually progress to more advanced exercises as your performance improves. This approach not only enhances your overall function but also helps lower the risk of injuries.


Comments